Scene tab
Accel VR is designed to explore multiple products and KDRs at the same time to create a layout, that is to say, a staging.
Below are the actions available to manipulate a product or set of products in the viewport.
Icon | Action | Description | |
|---|---|---|---|
 | Show | Shows the selected product. | |
 | Hide | Hides the selected product. | |
| Open a database or layout | Open the database repository. By clicking this button Import file directly to the scene opens the product or a layout to display it directly in the viewport. 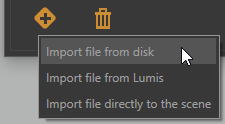 NoteDepending on the database weight, the import can take several seconds. The default address provided for the Lumis 3D server is https://lumis3d.lumiscaphe.com/. However, you can change it with your own domain name by clicking on this icon You can then add your selection of files (product and/or layout) to the scene by clicking on the Open button. TipTo select and open multiple files (product and/or layout) at the same time hold the key Shift or the key Ctrl of your keyboard. If you choose to import a file from Lumis 3D you will be prompted to identify yourself to sign in to Lumis 3D by using your login details. Browse the content of Lumis 3D to select the file you want to import, double click to open it (or single click on it, and then Open). | |
| Duplicate | Duplicates the selected product (s). | |
| Delete | Deletes selected product(s) in View. TipTo select and open multiple files (product and/or layout) at the same time hold the key Shift or the key Ctrl of your keyboard. | |
| Delete all | Deletes all products at once. | |
| Save layout | Save your scene layout in KPL format. |


Note
Notions on the layout of a scene.
To load multiple products in the viewport, start by opening the first product from the list. This product becomes the main product, or "master" product. Choose as the "master" product the one with the environment and post-processing attributes that you want to apply to your scene. Regardless of the opening order, you can freely modify the "master" product in the list by selecting another: the gray checkmark  turns orange
  .
.
The Scene tab consists of four accordion menus.
Configuration
The Bookmarks allow you to run and combine different configuration options.
Tip
Your database must contain configuration bookmarks set up prior to export and created in the Library tab of the Create Configurations editor in Patchwork 3D
Timelines
The Timelines allow you to animate your model with different data prepared in advance in Patchwork 3D.
Icon | Navigation mode | Description | |
|---|---|---|---|
| Go to start | Starts the animation in reverse mode. | |
| Play | Plays the animation. | |
| Pause | Pauses the animation. | |
| Stop | Stops the animation. | |
| Loop | Repeats the animation in a loop. |


It is also possible to control the animation with the cursor.
Transformation
In this section you can position, resize, and configure the instance of your product in the 3D View with the X, Y, Z axes.
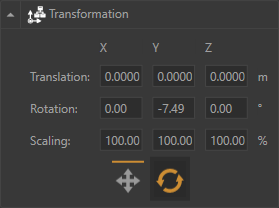
The Transformation accordion menu
Cameras
This section allows you to display camera bookmarks and, add new ones by clicking on this icon  . You can also edit
  each camera bookmark you have created in Accel VR by renaming them and changing their position.
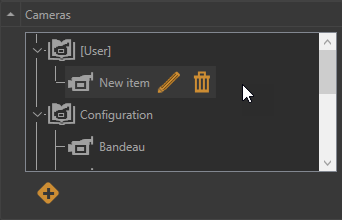
The Cameras accordion menu with a camera bookmark created by the user.