Viewing Content
Content within a space can always be viewed or previewed by all members of the space.
Lumis 3D contains viewers specifically adapted to the exploration of 3D models in the form of digital aspect mockups.
Digital Aspect Mockups
Digital aspect mockups (DAMs) are 3D models that contain additional information concerning the final, realistic aspect of the finished model, as well as interactive elements including animation and configurable parts.
Digital aspect mockups may be uploaded in the KDR format, a format that supports the digital aspect mockup produced in Patchwork 3D (any Enterprise Edition and from Community 2022 Edition).
Digital Aspect Mockup Explorer
You can view digital aspect mockups in KDR format if they are present in the current space. To view a KDR, double-click on the item you would like to view.
When viewing KDRs, you have an overview of all of the options included in the digital aspect mockups.
The name of the file appears in the upper left corner.
Top Right Menu
At the top right of the screen, multiple options are available to control how you view and interact with a model.
The  Comments tool can be used if you want to add comments to the model shared by your coworkers. They will automatically receive a notification by email or by SMS according to their notification preferences chosen in User Profile.
The  drop-down menu gives you a choice between the different viewing modes:
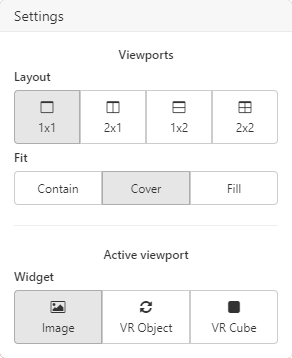 Drop down menu without split mode. | 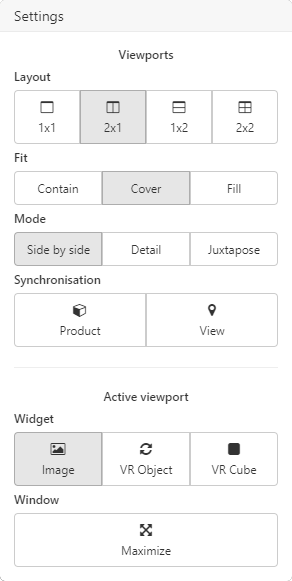 Drop down menu with split mode. |
Viewports part:
Layout section
 contains the controls to split the viewing area into multiple panes. Once split, the active pane is marked with a yellow border. All actions will be applied to the active pane. Layout section is closely linked to Mode section. Three different modes are available only when the view is split. Side by side mode displays a view comparison, Detail mode displays a model close-up into a new pane and Juxtapose mode displays a view comparison slider.
The Synchronisation section allows you to synchronize the camera position (
 View) and the model's product (
 Product) in all panes.
The Fit section allows you to set the appropriate image size with three different following formats. Contain displays the viewing area with its original size (adds black borders). Cover fills pane with the viewing area (no black border added). Fill adjusts the viewing area to the pane size (zoom in/out).
Active viewport part:
 Image: In an image, the camera is stationary. The viewer provides a picture of the digital aspect mockup from a preset perspective that cannot be modified in real-time.
 VR Object: The digital aspect mockup can be turned interactively 360 degrees by clicking and dragging with the mouse. The initial position is taken from the Patchwork 3D camera position. This is the default mode.
 VR Cube: Cubes are typically used to position the viewpoint inside the digital aspect mockup. The camera position is stationary, but the camera can be turned in any direction in real-time to observe the interior space, such as the inside of a vehicle or a room, from all angles. Click and drag the mouse to change the direction. The initial position and orientation are taken from the camera information.
You can also enlarge the active pane to cover the full viewing area (Maximize
 ). When enlarged, click on again to return to the multi-pane view.
The  button displays or hides a summary of the current view and configuration used for the model. It lists the model shown, the camera used, and all active configuration options.
The  button can be used to download a JPG or PDF version of the image currently displayed in the viewer's active pane. This file will be saved to your computer or device.
The
 Snapshot Image tool can be used to save the image currently displayed in the viewer's active pane. You can choose the space and the folder in your Lumis 3D account where the image will be saved.
If your KDR contains timelines or animations, the
 Video button will open the Snapshot Video editor to produce a video of the animation.
The  button can be used to share a link of your model (DAM). Anyone in the domain with access to this page can share this link. (Sign-in is required).