Timelines
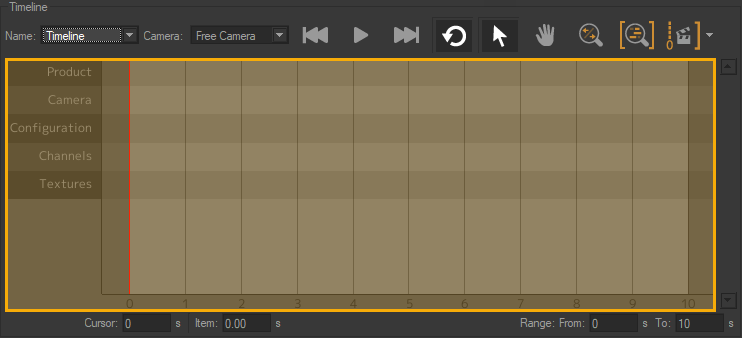
A timeline is a set of animation tracks. Every new timeline is initialized with tracks for Products, Cameras, Configurations, Channels, and Textures. Each track accepts a given type of animation keys or clips, which are available in the libraries on the right-hand side of the editor. You will find more information about the editor in the corresponding chapter: Timelines (Editor).
Tracks accepting channel animation clips and video textures are added below the existing tracks. To simplify creating and deleting additional tracks, the following strategy is applied:
There will always be one empty track of each kind: if a clip is inserted into the last empty track, a new one is created at the bottom of the list of tracks.
Only one track of each type is empty: if a track no longer contains any clips, and if another empty track already exists, the newly empty track is deleted.
A slider allows you to scroll through the tracks if the window is not big enough to display them all.
Items in Tracks: Clips and Keys
Add clips and keys to the timeline by dragging them from their library tab and dropping them onto their corresponding track.
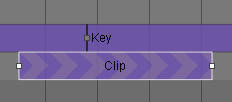
Keys impose an instantaneous state change. They are positioned at a given point in time. Drop them at the time at which the change should occur.
To help you identify the elements you have loaded, the stretch of time during which the key is active is assigned a solid color and the name of the key is shown. Each key is activated at its position in time and continues to be active until it is replaced by a different key.
Note
In a key track, the absence of a key at the beginning of the timeline range is handled differently depending on the type of key.
See the sections on the types of keys (Product Keys and Configuration Keys) for more information.
Clips are sequences of changes over a defined period of time. Drop them at the time when the sequence should begin.
To help you identify the animations you have loaded, each clip is assigned a striped color, and the name of the animation is shown within the clip on the timeline. The length of the clip is a visual representation of the time required to play it. If your clips overlap, the clip that begins first will play until the beginning of the next clip, which will then play instead. The clip that begins last will always have priority.
Some clips contain keys that mark points within the clip. This is the case with bookmarks in a camera animation clip and key frames in channel animation clips. You can reposition a key within a clip. First, select the clip. Then, click on the key and drag it to a new position within the clip.
Once added to a timeline track, items can be:
Selected,
Repositioned,
Removed: Pressing the Delete key removes the selection from the timeline.
Selecting Individual Items
Select a single item in any track by clicking on it.
If only one item is selected, its information will be shown and can be edited if the corresponding editor is already open.
To clear a selection, click on an empty area in the tracks.
Selecting Multiple Items
Select multiple items by holding down the left mouse button and dragging to create a selection zone. This zone will select the keys whose central point lies within the zone as well as the clips that are entirely enclosed by the zone.
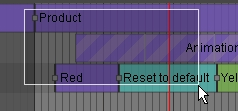
Using a selection zone to select multiple items.
You can also select multiple items by holding down the Ctrl key and clicking on the items in the tracks that you wish to include in your selection.
While the Ctrl key is held down:
Dragging to create a selection zone will add items in that zone to the current selection,
Clicking on an item that is already part of your selection will remove it from the selection.
To clear a selection, click on an empty area in the tracks.
Repositioning Items
To reposition an item or group of items already in a timeline track, begin by selecting the item or group. Then:
enter the start time in the Item field,
drag and drop the selection within its track or, in the case of channel animation clips, onto another channel track.
In the case of a multi-item selection, entering a value on the Item time zone will align the activation of all of the selected items at the new time value.
A magnet effect allows you snap both keys and clips to the beginning and the end of the timeline range. This magnetism also helps you to position clips one after another with no pause in between. Additionally, you can use it to align the activation times of elements in one track with elements in other tracks.
Resizing Clips
To change the duration of a clip, position the mouse over the left or the right end of the clip. Click and drag the end; this will change the length of the clip.
Resizing a texture clip has no effect on its playback speed. The video will be stopped before its end, or its playback will be looped in order to fit the length of time established by the size of the clip.
You cannot resize selections of multiple clips at once.
Loop, Reverse, and Delete Elements
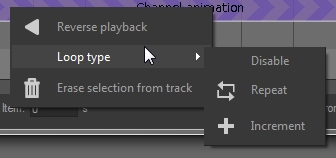
A right-click on a selected timeline key or clip in a track, or on a selection containing one or more elements, opens a menu from which the following actions are accessible:
 Erase the selection (keys and clips) from the track,
 Reverse the playback (clips only, excluding texture clips),
Tip
The background chevron shading indicates the playback direction of a clip. The chevrons point to the right when the clip is played forwards. When the playback direction is reversed, the chevrons point to the left.
Loop the playback of the selected clips (excluding texture clips) by selecting the type of loop:
 Repeat: This mode repeats individual clips an infinite number of times. At the beginning of each repetition, the values that have been modified are reset to their initial value, and the animation is replayed identically. A clip that rotates an object five degrees will be returned to its initial position and will then move the object the same five degrees again.
 Increment: This mode repeats individual clips an infinite number of times. It is available only for channel animations. Any values that have been modified retain their modification, and each new repetition of the clip adds the new modification to the previous one. A clip that rotates an object five degrees will move it from zero to five degrees on the first repetition, from five to ten on the second, from ten to fifteen on the third, and so on.
Disable: This option removes looped playback for the selected clips.