Import User Interface
The import parameters are accessible from Shaper > Model > Import a CAD model and from File > Import in a new database.
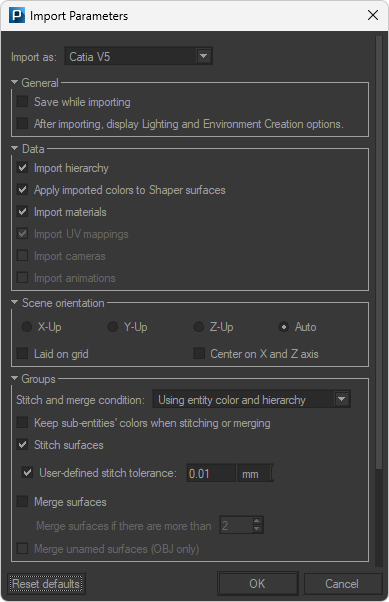
Import Parameters dialog box for a CATPart file
Depending on the FBX file you wish to import, the following options will be available:
General
If the Save while importing checkbox is ticked, Patchwork 3D will first ask you:
to save your CAD model import in a P3D file format that can be interpreted by Patchwork 3D,
whether or not to save the rendering cache (for more details please refer to the following chapter: P3D Database).
Note
Save while importing allows you to save the P3D file at regular intervals to avoid saturating the memory when the CAD model being imported is large. Please note that this option has an impact on the import time.
If the After importing, display Lighting and Environment Creation options checkbox has been ticked, at the end of the import, the Scene parameters window is displayed, so that you can select the elements constituting the creation of a scene, that is to say, its lighting and its environment. Details of the available options can be found below in the section Automatic scene preparation
You can choose the following options to import an FBX file:
colors
cameras
The scene orientation may differ in Patchwork 3D depending on the CAD software with which the scene was created. Patchwork 3D helps you fix this.
Choose here the scene orientation of the original file.
X-Up
Y-Up
Z-Up
Auto, if available for the file format.
In addition to the orientation of the scene, you also have the possibility of choosing the location of the imported surfaces with the following options:
Laid on grid
Center on X and Z axis
Groups
Note
Group options are only available for Nurbs formats.
Notice
By default, the Keep sub-entities' colors when stitching or merging option is not selected during import, and Patchwork 3D will generate a single surface.
Select the Keep sub-entities' colors when stitching or merging option to reproduce, upon import, the assemblies and parts of the original model with their respective color.
This option is only functional if the Stitch surfaces or Merge surfaces is checked.
Choose here whether or not to join the surfaces together by checking the Stitch surfaces checkbox.
The User-defined stitch tolerance option allows you to personalize the stitch tolerance criteria. By default, the setting is calculated automatically depending on the size of geometry (unchecked box). On the contrary, when the option is checked it allows you to define the threshold (distance) from which the surfaces will be joined.
The Merge surfaces option creates a single surface from a user-defined threshold.
With certain objects, this automatic calculation may not produce the desired stitched result; thus, by checking this box, you can specify a tolerance in the unit of your choice, which is fixed and not dependent on the size of the objects.
Note
Tessellation options are only available for Nurbs formats.
Patchwork 3D uses a powerful geometry engine that enables it to preserve the geometrical information of each surface.
Surface and Normal parameters will allow you to adjust the tessellation finesse when importing.
Note
The animation options are only available for FBX file format.
Import to timeline with user-provided name checkbox lets you replace the original name of the animation on your own.
Simplify animated meshes if needed simplifies the animation as explained in Timelines paragraph.
Animated meshes box allows you to import FBX animation with two different modes.
Basic mode: The animation will be imported as a standard channel animation in your timeline.
Advanced mode: The animation will be imported as an advanced channel animation in your timeline.
Node curve box allows you to select between two different options if you want to edit or not the animation curve.
Import curve option will convert to an editable format by Patchwork 3D which allows later on the edition of the curve.
Bake animation option will import the animation curve without the possibility to edit it.
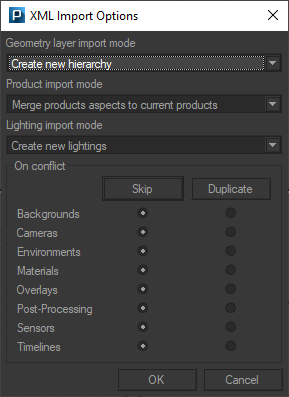
You can record the import steps in a log file of your choice with the option Activate the log or define the P3D Xml settings for the formats concerned and the Specific settings to the data format.
When importing an FBX file that contains materials, Patchwork 3D allows you to choose between importing materials into an existing product with the option Merge products aspects to current products or add the materials to a new product with the option Create new products.
Automatic scene preparation
If the box After the import, display the lighting and environment creation options has been checked, at the end of the import, the following window is displayed.

Check the desired options and Patchwork 3D takes care of the rest to create the scene with its lighting and environment.
The option Create an environment with a hemisphere is particularly useful if you want your model to be quickly staged in a very realistic environment. Patchwork 3D will take care of creating for you a hemisphere, an environment and a environment material. The latter will be automatically assigned to the surface of the hemisphere. The HDRI environment files recognized by Patchwork 3D are HDR and EXR. You can also add a plane with the shadow of the imported model to your scene (cf. Matte material ).
Tip
If you do not select an HDRI environment, Patchwork 3D will automatically apply the Studio environment on the surface of the hemisphere.