Manipulators
Please find below the complete list of available manipulators.
Head manipulator
The Head drop-down menu allows you to choose the manipulator that will control the head.
Notice
New features in Accel VR 2022
The head can be controlled by the following devices:
a virtual reality headset > HMD head manipulator (Nothing to configure here)
a gizmo > Gizmo Head Manipulator
Use the Translation or Rotation tool to move the head gizmo without using a device just by using the mouse. This functionality is very useful for quickly initializing from Pilot the position of the operator's head, that is to say, what he will see.
a VRPN device > VRPN head manipulator
Select the configuration of the device that has already been done in the VRPN devices management. That is the name of the tracker and its orientation.
Device manipulator
The Device drop-down menu allows you to choose the device that will control the interactions.
a virtual reality headset > HMD interactions
Touch zone must be down to interact (Vive) is selected by default to avoid undesirable movements induced by controller touchpad. This feature is useful for an HTC VIVE controller that has a touchpad. On the other hand, uncheck this feature for an Oculus Rift controller.
a gamepad > Gamepad interactions If you have selected a gamepad as a manipulator, it is necessary to select on which side the interactive menu will appear. Cf. Left / right device side.
Head to pad distance defines the position of the interactive menu.
a VRPN device > VRPN interactions Select the configuration of the device that had already done in the VRPN devices management in addition to the names of the VRPN left and right instance.
Interaction manipulator
The drop-down menu Interaction lets you choose the interactive menu that will help you control interactions.
Interactions can be controlled using the interactive menu and the interaction device called "system":
PieMenu
MoveNAct
Controller
Touch Interaction Manipulator
Tip
The operating mode of the interactive menu depends on the device used and on the possibility of using one hand (gamepad, Apex in a CELLAR) or two hands (HTC VIVE®, Oculus Rift®, and HP Reverb).
PieMenu System
From the VR tab of the configuration side panel, you can access the advanced settings of the PieMenu by clicking directly on this icon  .
.
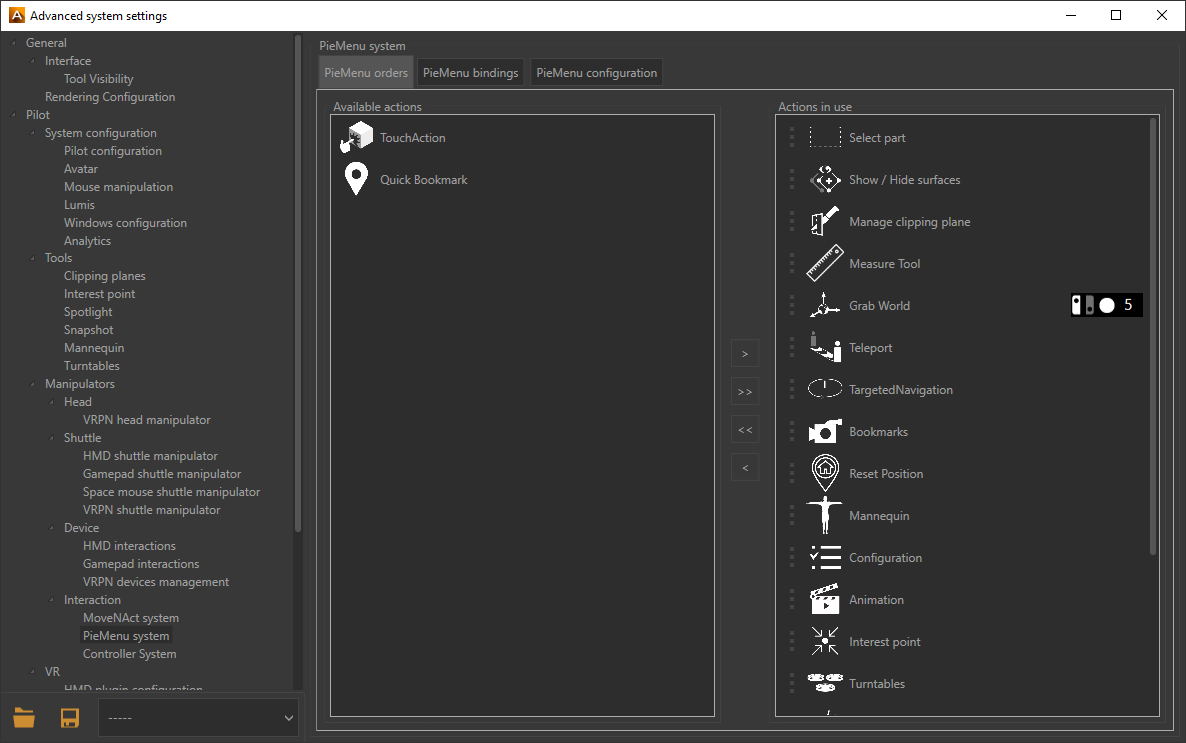
PieMenu advanced settings window.
The Pie Menu tool is configured using the following three tabs:
The PieMenu Orders tab lists available interactions on the left and displays interactions you want to use on the right. To add an available action in the Actions in use box, click the arrow [>] or [>>] to add them all. In order to remove a used action, click the arrow [<] or [<<] to remove all of them.
Tip
Make sure there is at least one action in the box to interact with your 3D model. Depending on the interaction selected, the color of the pointer laser may change to indicate to the user that an action is possible.
The PieMenu bindings tab allows you to define an action for each button of the interaction device (gamepad, virtual reality headset controllers, zSpace stylus, etc.). To assign an action to the interaction device click on
 , then press a button on the interaction device. Accel VR saves the action automatically. If you make an assignment error, click the
  button to delete the assignment. Click again to start the procedure again.
The PieMenu configuration tab allows you to configure the appearance of the interactive menu. Through the Interaction side drop-down menu you can assign the action to the left or right hand of your interaction device. Screen Position allows you to display the interactive menu on the left or right device of your immersive system. You can choose to display the interactions and the interactive menu on the same interaction device by choosing the configuration Right and Right in the drop-down menus. On the contrary, you can choose to distinguish the interactions of the interactive menu by choosing Right and Left. With this configuration, the operator uses the right hand to target an object to interact with it, the left hand is used to display the interactive menu. You can also do the opposite configuration by assigning interactions to the left hand and the interactive menu to the right hand. If the PieMenu is too close to the operator's hand you can move it in any direction you want with the following parameters: depth, height, lateral move. You can also change the color of the PieMenu with the following parameters: Pies back color, Pies text color, and Pies icon color.
MoveNAct System
From the VR tab of the configuration side panel, you can access the advanced settings of the MoveNAct system by clicking directly on this icon .
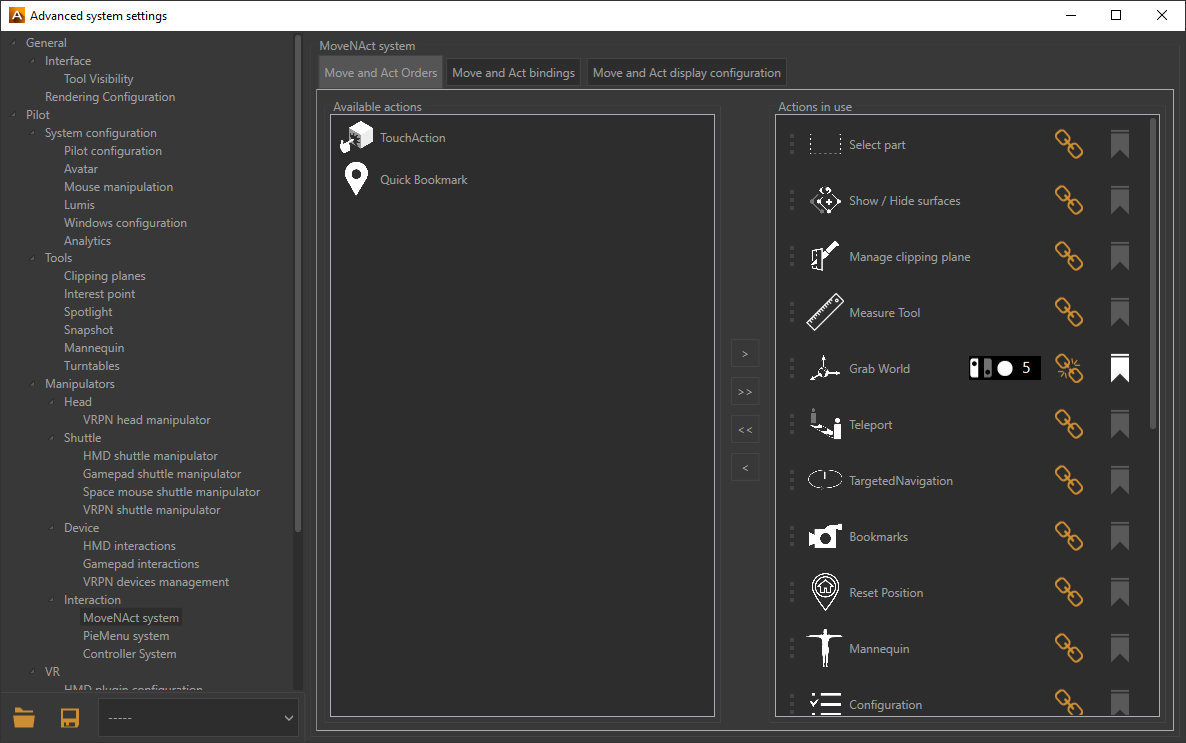
MoveNAct menu advanced settings window.
The MoveNAct system use the followings tree tabs to be configured:
The Move and Act Order tab lists the interactions available on one side and displays the interactions you want to use on the other. To add an available action in the Actions in use box click the arrow [>] or [>>] to add them all. Conversely, to remove a used action click on the arrow [<] or on [<<] to remove them all.
Tip
Make sure there is at least one action in the box to interact with your 3D model. Depending on the interaction selected, the color of the pointer laser may change to indicate to the user that action is possible.
This icon
 enables or disables the immediate assignment of a one-touch interaction. It is a sort of shortcut. Once activated, the immediate assignment executes the interaction directly when the button is pressed. You do not need to use the other device to perform the interaction. This frees the other device and allows you to combine another interaction.
The Move and Act bindings tab allows you to set a move to each button of the selected device. To assign a move to a button, just click on
, then press a button on the controller. Accel VR saves the action automatically. If you make an assignment error, click the
button to delete the assignment. Click again to start the procedure again.The Move and Act display configuration tab modifies the look of the interactive menu by choosing the color of each element (text, icons). The Attached side allows you to select in which hand (right stick or left stick) you want to display the interactive menu. By default, the Display mode is set to World mode which is suitable for the MoveNAct use with a full-range immersion device such as an HTC VIVE® or Oculus Rift® headset. We recommend the Screen mode if you combine the use of the Move and Act in a CAVE or a Powerwall. This makes it easier to use the menu by displaying it in 2D on a remote screen. Scale factor, Menu orientation, and Menu translation are the parameters for changing the size and position of the interactive menu.
Controller System
Notice
New features in Accel VR 2022
From the VR tab of the configuration side panel you can find the advanced settings of the Controller System by clicking directly on this icon .
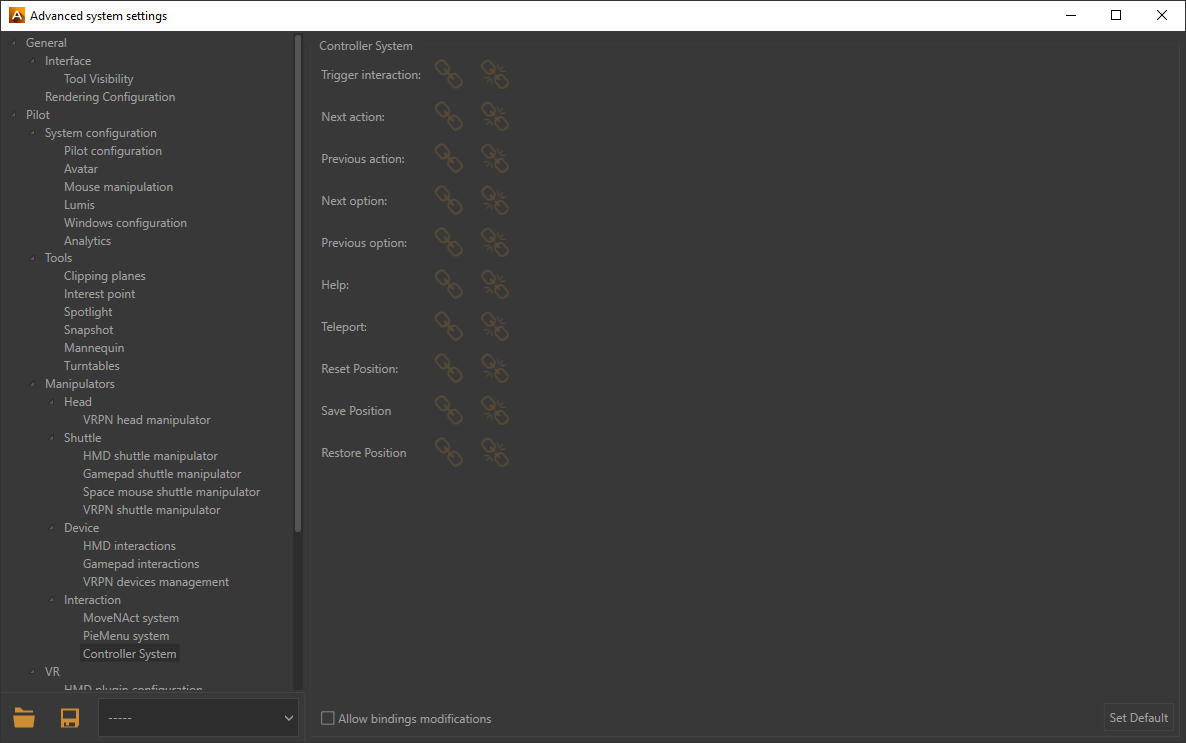
Advanced System Settings Window of the Controller System.
Assign here the available interactions to each button of the controller. To assign an interaction to a button, click bind , then press the controller button(s). Accel VR saves the binding automatically. To modify an assignment, click on to unbind it. Click again on to start the process again.
Shuttle manipulator
The Shuttle drop-down menu allows you to choose the manipulator that will control the shuttle.
Notice
New features in Accel VR 2022
The shuttle can be controlled by the following devices:
a virtual reality headset> HMD shuttle manipulator
You can change the Planar speed and the Rotation speed by clicking on the following icon
 .
.Touch zone must be down to interact (Vive) is selected by default to avoid undesirable movements induced by controller touchpad. This feature is useful for an HTC VIVE controller that has a touchpad. On the other hand, uncheck this feature for an Oculus Rift controller.
a gamepad> Gamepad shuttle manipulator
Devices with two analog joysticks such as a gamepad can be used to move the shuttle around the 3D world. One joystick is used to drive movement on the horizontal plane, the other allows you to rotate and move up or down if the altitude is not locked.
The Lock Altitude checkbox limits the shuttle movements on the horizontal plane. When this checkbox is ticked, the shuttle's altitude remains stable, despite any modifications to the position of the product.
The Follow look direction checkbox synchronizes the movements of the head with the direction taken by the exploration shuttle.
Note
Lock Altitude and Follow look direction are only available for gamepad configuration.
You can change the Planar Speed, the Height Speed, and the Rotation Speed by clicking on the following icon
.a VR mouse> SpaceMouse shuttle manipulator
Configure the advanced settings of your SpaceMouse by clicking on this icon
.To manipulate the SpaceMouse Accel VR uses two distinct modes:
The OriginFocus mode moves the shuttle around the center of the world. The Avoid crossing ground checkbox prevents the operator to move the shuttle under the ground.
The Helicopter mode moves the shuttle like a helicopter in flight. The movements follow the movements applied to the axes of the SpaceMouse. The Lock the horizon checkbox stabilizes the movement of the shuttle by locking the horizon.
In both modes, you can fine-tune the SpaceMouse's movement controls by modifying the movement factors with the sliders: Movement Speed, Rotation speed and Dead Zone.
If your settings are no longer correct, you can reset them by clicking on the Reset button.
a VR device> Device Shuttle manipulator
The shuttle manipulator configuration controlled by a device can be done directly from this icon
.The Options box allows you to choose the Interaction side (left, right), to adjust the Planar speed, the Height speed, and the Rotation speed of the device that will control the shuttle.
The Bindings box allows you to assign shuttle movements to buttons on your device. Please refer to the binding procedure described in the Device manipulator section to configure the buttons of your device.
a gizmo > Gizmo Shuttle Manipulator
Use the Translation or Rotation tool to move the shuttle gizmo without using an immersive device just by using the mouse. This feature is useful for quickly initializing from Pilot the shuttle position in the virtual environment.