Shared Settings
Dimensions of the Media Output
The dimensions and resolution for the image to be rendered are provided in the Dimensions zone.
The Format drop-down list, available for all types of snapshot except cubic VR panoramas, provides access to the most commonly-used sizes and formats. Certain formats, such as User Defined or User Defined in Units allow the dimensions to be provided directly as values. By default, Patchwork 3D proposes the format Defined by Viewport.
Custom formats can be added to this list from the User Presets tab in the Patchwork 3D Settings.
Rendering Engine
Each editor offers the choice of rendering engine to use: OpenGL or Raytracing.
OpenGL
The Configure button beside the OpenGL selection opens the OpenGL Settings window.
Choose whether or not to apply:
Antialiasing;
the Mipmap,
Mirrors reflections,
Alpha background.
Choose the level of Super Sampling from the drop-down list.
Use the slider to define the level of Specular anisotropic filtering.
Click on OK to save your changes.
Raytracing
The Configure button beside the Raytracing selection opens the Raytracing Settings window. For more information on these settings, see the chapter Raytracing Settings (Editor).
Files
The Files zone contains the controls for the creation of an image file.
In this zone you can set:
The output directory where the image file will be saved, as well as the name of the file and its extension,
Whether to Open File Selector or not when rendering. When Open File Selector is selected, clicking on the Render button will show the dialogue box offering the choice of file name and type. This option is selected by default.
Note
Image rendered for VR objects and for cubic VR panoramas are saved in the Snapshots directory by default.
The following file formats are supported for video output:
.jpg
.png
.bmp
.tif
.exr
.hdf
.psd
The following file formats are supported for video output:
.avi
.png
.jpg
.bmp
.tif
Whether to Confirm Overwrite or not when rendering. When Confirm Overwrite is selected, if a file with an identical name is detected, P3D Conf Explorer requests your confirmation before replacing it with the file being created. This option is selected by default.
The configuration of the compression according to the file type,
The configuration of the layered export for .psd files.
Note
Images with an alpha layer must be saved as .png files to keep their transparency. In these cases, the format PNG is automatically proposed by default.
Compression
Click on the Configure Compression button to open the Compression window.
The compression is adjustable for each type of file to export. For each type of file, the higher the value, the better the quality.
JPEG: slide the cursor to define the compression.
PNG: slide the cursor to define the compression. Tick the Export as 16 bits checkbox if you want to activate this option.
Image Compression for Animations: slide the cursor to define the compression.
Image Compression for VR Objects and Cubic VR Panoramas: slide the cursor to define the compression.
If you are configuring compression for a multilayer image, use the PSD options. The options available for multilayer image compression are:
No compression: the output file will not compressed,
RLE: RLE compression mode is used,
ZIP: output file is compressed using the ZIP format.
To export as a file using 16 integer bits, check Export as 16 bits. By default, export is performed using 8 integer bits. Floating point formats (with 16 or 32 bits) are not available.
Layered Image Options
The snapshot export in PSD format feature allows for exporting various layers of a view being captured. Each exported layer is saved as a layer in the PSD file.
To export a multilayer image, select the file extension *.psd, then choose the layers to add to the file. Click on the Configure Layered Export to open the Layered Image Options window. The settings defined in this window apply to images exported as *.psd files only.
You can choose to export a layer for each of the following options:
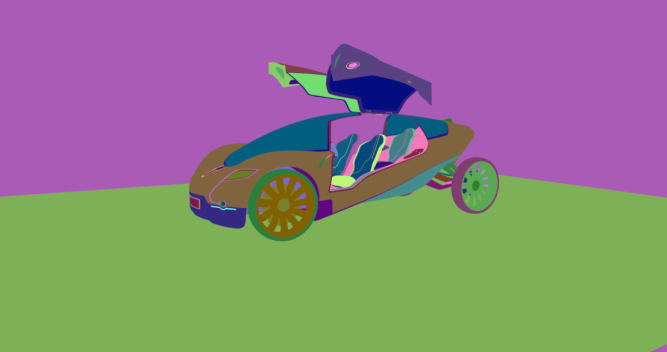
Composable Image containing three layers: a background, a multiplicative layer, and a layer of the product’s opaque surfaces,
Composited Image,
G-Buffer,
Wireframe,
Z-Buffer,
Lightmaps.
By default, only the Composable Image option is selected.
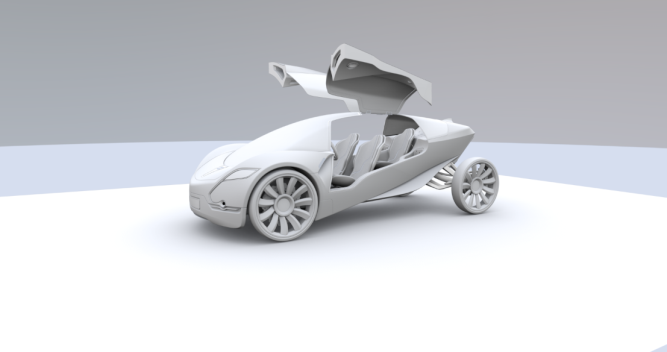 | 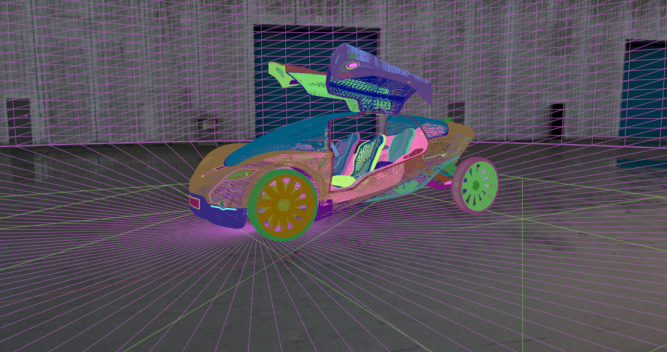 |  |
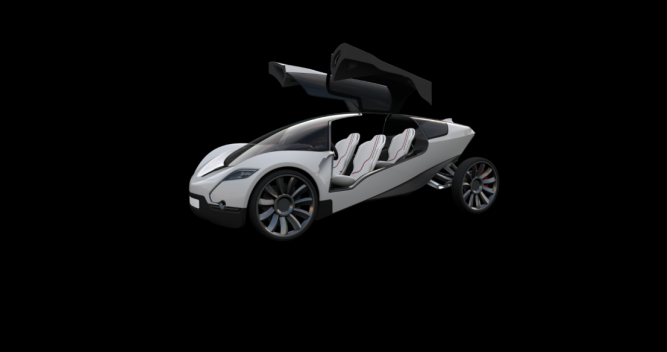
Samples of layers from an exported PSD file: lightmap, wireframe and G-buffer views.
 |  |
 |  |
Samples of composable layers and composited image generated using Composable Image and Composited Image options respectively.
Using Composable Layers
The following composable layers can be obtained using the Composable Image option:
A layer with the background of the snapshot,
A multiplicative layer. When applied to the previous layer, areas corresponding to transparent surfaces are colored,
An additive layer which adds opaque areas and reflections on transparent surfaces to the final image.
 |  |  |
Example of view reconstruction: over the background layer (left) the multiplicative layer (result of the process shown on the right) is applied. Then the additive layer is applied on the resulting view to reconstruct the final image (bottom).
The compositing technique described above allows the substitution of the background while maintaining a correct filtering by semi-transparent surfaces. This would be impossible to achieve with a transparency based on an alpha layer.
However, this technique is not compatible with the use of post-processes. Therefore, post-processes are disabled for rendering of composable layers.
Internal Render Info
The Internal Render Info zone summarizes various settings. The applicable elements from among following information are displayed:
Width of the image in pixels,
Height of the image in pixels,
Pass, the number of passes to render the image,
The number of Frames to render,
Sampling,
Memory.
Snapshot Process
Various options are available in the Snapshot zone, depending on the type of output:
Show Info: displays, along the bottom border of the active viewport, a summary of the dimensions settings of the snapshot.
Viewer: sets the image viewing window to open automatically during rendering.
Background: to open the color chooser. The selected color will be used as a background in the rendering where the view is not entirely enclosed by geometric elements.
Rendering Buttons
Once all of the settings have been defined, click on the Render button to start the generation of each snapshot used to compose the required output.
You can also Add to Snapshot Batcher to delay rendering until later, or Replace current Snapshot Batcher item with the current settings of the open snapshot editor.