Creating Complex Rules
A complex rule establishes the relationships between defined symbols using the logical operators "and", "or", "not" and "xor". If the conditions are met, the rule is evaluated as true and the target layers are displayed.
Complex rules are created manually by typing the desired expressions. To create a complex rule, use the New Complex Rule button in the Configurations editor.
Open the Configuration editor. Go to the Editors menu > Create configurations.

Click on the button
 New complex rule . The editor Complex rules will be displayed.
In the first text box, the editor will suggest a default name for your rule. Replace " Rule" by an explicit name which clearly expresses the function of the rule.
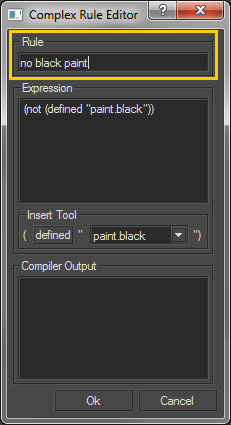
Replacing "Rule" with a meaningful rule name.
In the Expression text box, type out the Boolean expression. Refer to the chapter on Rule Syntax for more information on expression syntax.
You can use the Insert Tool to insert simple rule expression within your complex rule:
Select the desired existing symbol from the drop-down list.
Click "defined" to insert the expression at the current cursor location in the Expression text box.
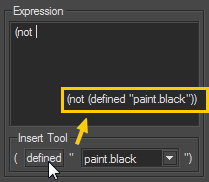
Using the Insert Tool to insert the simple expression "(define "paint.black")" in a complex expression.
Click OK to validate your rule. If the rule cannot be validated, the validation problems will be listed in the Compiler Output box. These problems must be corrected before you can validate your rule.
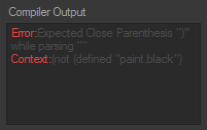
Compiler output error for missing final parenthesis.
Tip
The tools found in the Inspection tab are particularly helpful to analyze the evaluation of complex rules.
Your rule has been created, but you still need to assign target layers to it:
Return to the Configurations editor. In the rules list, select the rule you have just created.
Drag and drop your desired target layers onto the Target list. You can drag layers from any of the following:
Shaper: the model’s Geometry Layers list in the sidebar,
Shaper: the model’s Illumination Layers and their colors from the list in the sidebar,
Shaper / Matter: Position Layers editor,
Matter: Aspect Layers editor,
Matter: Environment Layers list in the Product Environments editor.
Matter: Overlay Layers list in the Overlays editor,
Tip
Aspect and environment layers are stored at the product level. This means that a given aspect or environment level only affects the product with which it is associated. To apply the rule to several products, add the appropriate target layers for each additional product.
Tip
To ensure the visibility of configurations with overlay layers, the overlay in question must be assigned to a sensor used in the viewport camera. The overlay display must be enabled.
Warning
You cannot use a given layer as the target for two different rules.