Live Mode (Editor)
Accessible in: Matter: Editors > |
Live Mode is an editor that associates a chosen surface with one or more chosen animations. These associations are then used in Live mode, a navigation mode in which clicking on designated surfaces or pressing preset keys triggers animations.
Defining Triggers
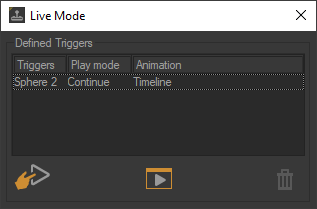
The editor that sets up Live mode is composed of two main sections: the list of animations associated with a trigger, followed by the operations toolbar where the buttons are located.

Live Mode Editor
The list of triggers contains all of the animations with a trigger. For each animation, the following information is displayed:
Title | Information |
|---|---|
Trigger | The name of the surface or Shaper object that acts as a trigger when clicked to start the animation. |
Play Mode | The name of the playback mode. This mode defines what happens when a trigger is clicked again after the playback of an animation has been started. |
Animation | The name of the channel clip or the timeline that will be played. |
This list can be sorted. Click on the column header by which you want to sort the list.
Tip
You can double click on a trigger in the list to edit it.
The operations toolbar contains the following buttons:
Icon | Function |
|---|---|
| Add a trigger. |
| Switch to Live mode in the main window. To exit the Live Mode, click the button |
| Delete the selected triggered animation. This disassociates the trigger and the clip or timeline, and removes the animation from the list in this editor. The clip or timeline is not deleted from the database. |
Creating a new triggered animation requires two steps: creating a trigger, then associating it with a clip or a timeline.
Tip
You must have created at least one clip or timeline in the Timelines editor.
Creating a Trigger
Use the button  to add a trigger. Two types of trigger are available:
Type | Function |
|---|---|
Mouse | This type of trigger plays a clip or a timeline when you click on a specific surface in the scene. |
Keyboard | This type of trigger plays a clip or a timeline when you press a specific key on the keyboard. |
First, select the type of trigger.
For a mouse trigger, select the surface, or kinematics node. You can do so using the list or by clicking on the button
 to use an eyedropper to pick a surface, a null, a vector or a rotation axis. When using a null, a vector, or a rotation axis, all of its child surfaces will function as triggers.
For a keyboard trigger, click on the button to record the keystroke that will function as a trigger.
Associating a Clip or a Timeline
Once the trigger has been saved, a window opens.
Select the clip or timeline to associate with the trigger.
Tip
A single trigger can trigger multiple clips or activate multiple keys. Each action taken will be listed separately. Multiple selection of clips or keys with keys Shift or Ctrl is possible ; this allows multiple lines to be created simultaneously with the same trigger.
Validate with the button OK or click on the button Cancel to close this window without saving an association.
Choosing a Play Mode
Choose one of the four modes from the Play Mode drop-down list. This mode defines the behavior of the playback if the trigger is clicked again while the animation is playing.
Mode
Description
Continue
Click on the trigger for a playing animation to pause it.
Click on the trigger for a paused animation to resume playback from where it left off.
Reset
Click on the trigger for a playing animation to restart it from the beginning.
Reverse with pause
Click on the trigger for a playing animation to pause it.
Click on the trigger for a paused animation to resume playback from where it left off, playing the animation backwards.
Reverse without pause
Click on the trigger for a playing animation to reverse the direction of playback: the animation will play backward from the current point.
Tip
If you do not choose a mode, the Continue mode is used by default.
Click OK to save this triggered animation or click Cancel to close this window without saving.


