Specific Settings for Panoramas
Available in: Matter: Snapshot > Snapshot Panorama |
Panoramas editor exports a timeline as a sequence of frames in a 360-degree panoramic video file. This editor allows you to specify all of the parameters for the conversion of your real-time animation to a frame-based video format that can be saved to your computer and read by interactive video players including YouTube, as well as virtual reality displays.
360-degree panoramic videos differ from standard videos in that the viewer is able to change the direction of view during playback by interacting with the video using a mouse, by changing the position of a mobile device, or by turning her head when using a VR set-up.
From the Panoramas editor, you can set the parameters for the conversion from real-time to a 360-degree panoramic video file:
The dimensions,
The panoramic settings, including the dimensions in angles of the slices used to compose the 360 degrees of the scene and the choice of mono or stereo feeds,
The video format, including file name, file extension, codec, and compression,
The settings for the OpenGL rendering engine,
The timeline that will provide the animation, and the frame rate to apply,
The frames to include in the video file,
A on-screen view of the frames as they are generated.
Once all of the parameters have been defined, click the Render button to launch the rendering of each frame and the production of the video file.
Note
During rendering, a dialogue box is displayed to show the progression of the creation of the video file. The Viewer button at the bottom of this dialogue box opens a frame viewing window.
At any time, you can pause the progression by clicking the Pause button, or cancel it by clicking the Cancel button. If you have paused the rendering, start it again by clicking on Resume.
Panorama Settings
Panoramas are composed of a number of slices, which are then assembled around the camera position to create the 360-degree visual environment. You will need to determine the width and the height of the slices required by your video. These dimensions are given in angle degrees.
The smaller the angle, the more slices your video will require. Each slice requires a separate pass. As there is a direct relationship between rendering time and the number of passes required, videos using smaller slice angles will require longer rendering times. It is recommended that you choose the widest angle with no rendering artifacts in order to reduce rendering time.
Horizontal degrees/slice: In stereo mode, separate feeds for the left and the right eyes are produced in order to provide depth perception. This increases the sensitivity to slight differences in horizontal points of view, particularly for objects in the foreground, which in turn requires more slices. When rendering in stereo mode, horizontal slices of a maximum of 3 degrees are recommended. In mono mode, most scenes will support a horizontal slice width of up to 45 degrees.
Vertical degrees/slice: Most environments will support a vertical slice height of up to 45 degrees.
Interpupillary distance: When stereo mode is enabled, the interpupillary distance can be personalized. This distance measures the space between the left and the right pupils of the viewer and is given in meters. If the Stereo mode is not enabled, the value in the Interpupillary distance field is not taken into account.
Dimensions Box
The dimensions of the animation to be rendered are filled out in the Dimensions box.
The Format drop-down lists the most common sizes and formats. Some, such as User-Defined, allow you to directly set the dimension values. By default, the format Defined by Viewport is proposed.
Configuring the Codec
Video formats are defined by three parameters:
Container (file format),
Codec (encoding algorithm),
Bitrate (encoding quality).
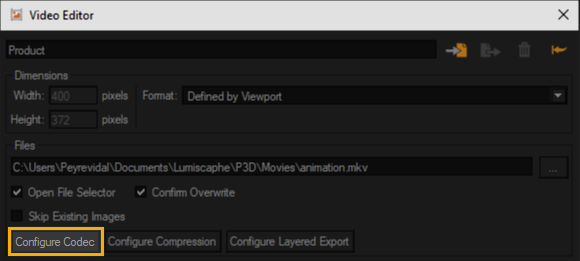
Access to video format settings.
When the container is changed, the codecs available in the drop-down list are updated according to the codecs supported by the format.
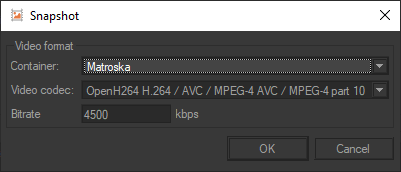
Video format settings.
The available containers (formats) are the following:
AVI (Audio / Video Interleaved) ;
MKV (Matrovska Video) ;
FLV (Flash Video).
Each video format can embed different encoding algorithms called codecs. Some of them are specific to a format. For example, only Sorenson codec is available for FLV format. Check the documentation of your movie processing software to known which format and codec best fit your needs.
The bitrate defines the amount of data stored to represent the frames. A low value will generate a small-sized file, but visual quality will be low. Conversely, a high value will generate a good quality video but the file will be larger.


Frame samples from videos generated using respectively a low bitrate (on the left) and a high bitrate (on the right).
Timeline Zone
The Timeline Zone provides the Timeline drop-down list from which you can choose the timeline to be rendered as a video.
Next to the timeline selection, specify the frame rate for the conversion from real-time animation to frame-based video.
Frame Output Zone
You have the option to render only a portion of the timeline range by providing the numbers of the desired frames:
Current Frame,
All Frames,
A Range of frames.
It is also possible to indicate the initial number for the index appended to the filename of each frame in the Output Filename zone. By default, the value of this option is "0."
Preview
The Preview zone provides a preview of each of the frames that will be rendered.
You can move within the preview sequence:
By using the buttons to step backwards (<) and forwards (>) one frame at a time in the sequence,
By providing a frame number,
By sliding the cursor along the bar.
You can also visualize the sequence by using the Play and Stop buttons. The frame sequence playback is displayed in the current active viewport.
Tick the Loop checkbox to play the video preview in a loop.
Note
The editors Videos and Timelines both use the active viewport to display playback. Consequently, you cannot view playback from both editors at the same time.
If the real-time playback in Timelines is playing, you will not be able to play the video preview. Use the controls in the Timelines to pause the real-time playback before playing the video preview.
Conversely, if video preview is playing, you must stop it in the Videos editor before starting real-time playback from Timelines.